Chocolate and peanut butter. Peanut butter and chocolate. Seriously, does it get any better? This cake is incredibly rich and I recommend having a very large glass of milk with it. But, it is amazing. Especially if you love the PB & chocolate combination!

Chocolate Peanut Butter Mousse Cake
Recipe from Baking Delights
2 cups sugar
1-3/4 cups all-purpose flour
3/4 cup Sharffen Berger Cocoa
2 oz bittersweet chocolate chopped
1-1/2 teaspoons baking powder
1-1/2 teaspoons baking soda
1 teaspoon salt
2 eggs
1 cup milk
1/4 cup vegetable oil
1/4 cup melted butter
2 teaspoons vanilla extract
1 cup boiling water
Peanut Butter Mousse (recipe follows)
Chocolate Ganache Glaze (recipe follows)
Directions:
Heat oven to 350°F. Grease and flour a 13 x 9 inch pan.
Stir together sugar, flour, cocoa, baking powder, baking soda and salt in large bowl.
Melt butter. Stir in chocolate until smooth and melted. Add eggs, milk,chocolate mixture, oil and vanilla; beat on medium speed of mixer 2 minutes.
Stir in boiling water (batter will be thin). Pour batter into prepared pans.
Bake 30 to 35 minutes or until wooden pick inserted in center comes out clean. Cool completely.
Cover with the peanut butter mousse. Chill. Cover with a smooth layer of the ganache. Refrigerate about 4 hours before serving.
Peanut Butter Mousse
2 cups creamy peanut butter
8 oz cream cheese
1 1/2 cups sugar
2 eggs
1 tsp vanilla
Beat the peanut butter and cream cheese together until blended. Add sugar slowly, beating well until all the sugar is incorporated. Beat in the eggs one at a time, beating about 3 minutes after each addition. Add vanilla. Spread on cooled cake in a thick layer.
Ganache
1 cup cream
12 ozs bittersweet chocolate chopped
Bring cream just to a boil. Stir in chocolate until smooth. Spread over the peanut butter while still warm smoothing it as you go.
Tuesday, December 30, 2008
Chocolate Peanut Butter Mousse Cake
Monday, December 29, 2008
TWD: Tall & Creamy Cheesecake
 THIS IS THE BEST CHEESECAKE EVER!!!!! Okay, I just had to get that out of my system! I have a cheesecake recipe that I have used for years that I absolutely love. It is a wonderful New York style cheesecake. And, while I think it is awesome, this cheesecake was just OUT OF THIS WORLD!
Dorie's cheesecake calls for heavy cream or sour cream to be added to the batter. I decided I wanted to make a holiday version, so I substituted eggnog for the cream. OH MY GOODNESS! I know, I know. A lot of caps in this post, but I can't stop singing the praises of this cheesecake. I can't wait to try different variations with this. Amazing... just absolutely amazing!
Thank you, thank you, thank you to Anne of Anne Strawberry for chosing this week's recipe. Head over to her blog for the recipe (right now... what are you waiting for?). Definately check out the blogroll, too, because I'm sure there are fantastic cheesecake creations out there today!
Nathan is home!!! Oh, and some food!
Anya has been attached to his side since he got home. I don't think she has stopped smiling since he walked in the door at Monica's. Eric hasn't wanted to be away from Nathan, either. He went right to him and only wants me when he's hungry! Of course, Nathan is soaking up every second with the kids and he has been on cloud nine since being home.
We have had a lot of good food over the last two days, too! On Saturday we celebrated Nathan's birthday with not one but two cakes! I wanted to try a new cake recipe (Paul Prudhomme's Spiced Pecan cake), but I wanted Nathan to still have his German chocolate cake. So, I made two mini's! YUM, YUM, YUM!!!
Sunday was our Christmas and I made a delicious Christmas dinner. We had ham, mashed potatoes, bacon wrapped asparagus, and pumpkin dinner rolls. For dessert we had an apple-cranberry crisp with eggnog sauce. OH MY WOW! I didn't want to go to the commissary, so I finally made my own eggnog and it was phenomenal! The recipe I used called for orange and lemon zest, so it was more citrus-y than I am used to, but I will definately use the recipe again.
Now for some pictures and the recipes for the eggnog and the crisp. I hope to be able to stop by some blogs and comment soon. Thanks for still checkin' in here!

Seeing Daddy for the first time

Together again
 Nathan and Eric on Christmas

Do you know how IMPOSSIBLE it is to get both kids to smile at the same time??? :)
 Nathan's birthday cakes
Apple-Cranberry Crisp with Eggnog Sauce

Sauce:
2 containers (3.5-4oz each) refrigerated vanilla pudding
1 cup eggnog
Fruit Mixture:
5 cups sliced peeled apples
2 cups fresh or frozen cranberries
3/4 cup granulated sugar
2 TBSP flour
Topping:
2/3 cup flour
1 cup quick oats
3/4 cup packed brown sugar
1/2 tsp cinnamon
1/2 cup cold butter, cut into pieces
Place pudding and eggnog in bowl; whisk until smooth. Cover and refrigerate.
Heat oven to 375. In large bowl, combine fruit mixture. Spread evenly into 2 qt baking dish.
In medium bowl, combine topping ingredients until crumbly. Spoon evenly over fruit.
Bake 35-40 minutes or until deep golden brown and bubbly. Serve warm with chilled sauce.
Homemade Eggnog
Recipe from Williams-Sonoma American Christmas
12 large egg yolks
3/4 cup sugar
1 tsp freshly grated nutmeg plus more for garnish
Grated zest of 1 orange
Grated zest of 1 lemon
2 cups whole milk
2 cups heavy cream
1/2 - 3/4 cup dark rum, cognac, or bourbon (optional) - I just added a little rum extract
In a large saucepan whisk together egg yolks, sugar, nutmeg, and citrus zests. Stir in the milk and cream. Place over low heat and cook, stirring constantly with a rubber spatula, just until the mixture thickens enough to coat the back of a spoon (160 degrees).
Immediately remove from heat and strain through a sieve into a pitcher. Cover and refrigerate to chill thouroughly, about 1 hour.
Serve alone or topped with whipped cream and nutmeg.
Saturday, December 27, 2008
December Daring Baker Challenge: French Yule Log
 When I saw the December challenge posted at the beginning of the month I was floored. This month's challenge is brought to us by the adventurous Hilda from Saffron and Blueberry and Marion from Il en Faut Peu Pour Etre Heureux. They have chosen a French Yule Log by Flore from Florilege Gourmand. This isn't the yule log that most people think of... this is basically a 6 layer frozen dessert. Yep... 6 different components going into one dessert!
Just reading the recipe was daunting. The recipe document was 18 pages! I printed out the recipe and didn't look at it for a week or two. I was so busy and knew that this challenge was indeed going to be DARING!
Once I finally sat down and read the recipe, I realized that while the recipe would be time consuming, it wasn't going to be difficult. It was going to require some organization and time management, but those are two of my strong suits! :) Most of the 18 pages consisted of variations on the main recipe and once I picked my flavors, it wasn't too bad!
I decided to use a vanilla mousse and make the remaining components chocolate. I didn't have any problems with the recipes. I think the biggest issue came from having to bake the creme brulee MUCH longer than the recipe stated in order for it to set.
Assembling the log was easy and, if I do say so myself, the final product looks great! It definately is a show stopper dessert. I was worried that with all the different layers that it would be overkill, but it worked! It tasted great! My favorite part was the crisp insert which tasted like a Crunch bar, only 100 times better. I LOVED it!!!
Thanks so much to our hosts this month. It was a wonderful challenge and I had a lot of fun with it! Check out the blogroll as I'm sure there are GORGEOUS logs out there!
HAPPY NEW YEAR!!!!
Thursday, December 25, 2008
Chocolate Zucchini Bread
In less than 24 hours I will be picking up Nathan at the airport!!! After 8 1/2 long months I can't believe that I will finally get to see him! I am so excited and nervous. I can't wait to see him and to have him home. I am so excited for Anya. She misses him so much and is jumping out of her skin waiting for him to come home. Most of all, I am looking forward to Nathan meeting his son for the first time. Eric is such a ball of joy and I know Nathan has been waiting for this day for a very long time! Tomorrow will be filled with so much happiness!
I have some posts scheduled for while Nathan is here and I plan on checking in every once and a while, but mostly I will just be enjoying having my hubby here for 18 days!
Now... a little food, anyone?
What is it about zucchini that goes so well with chocolate? When I think of zucchini, my thoughts don't go to chocolate, or even dessert for that matter. But boy does it really work! This chocolate zucchini bread is absolutely fantastic. It is so moist and incredibly addicting. This didn't last long at my house and it will be made again and again and again!
Chocolate Zucchini Bread
Recipe from Allrecipes
2 (1 ounce) squares unsweetened chocolate
3 eggs
2 cups white sugar
1 cup vegetable oil
2 cups grated zucchini
1 teaspoon vanilla extract
2 cups all-purpose flour
1 teaspoon baking soda
1 teaspoon salt
1 teaspoon ground cinnamon
3/4 cup semisweet chocolate chips
Preheat oven to 350 degrees F (175 degrees C). Lightly grease two 9x5 inch loaf pans. In a microwave-safe bowl, microwave chocolate until melted. Stir occasionally until chocolate is smooth.
In a large bowl, combine eggs, sugar, oil, grated zucchini, vanilla and chocolate; beat well. Stir in the flour baking soda, salt and cinnamon. Fold in the chocolate chips. Pour batter into prepared loaf pans.
Bake in preheated oven for 60 to 70 minutes, or until a toothpick inserted into the center of a loaf comes out clean.
Merry Christmas!
 I wanted to wish everyone a very merry Christmas! I hope your day is wonderful and filled with friends, family, and tons of fun! (Oh yeah... and enjoy some good food, too!)
Tuesday, December 23, 2008
Run, run as fast as you can!
Happy Christmas Eve! Well, it isn't officially Christmas Eve for us since we will be waiting for Nathan, but it is Christmas Eve nonetheless! We will be heading over to a friends house this afternoon for dinner and pre-Christmas gifts and then tomorrow we will be going back over there for Christmas day.
I'm pretty sure that most are done with their Christmas baking or at least are done adding things to their lists! But, just in case you aren't, here is a WONDERFUL gingerbread recipe. It requires no chill time, which is great for these busy December days! I got the recipe from Prudy of Prudence Pennywise and I love it! We are actually making another batch for Santa today!
I baked them for only about 7 minutes because I prefer softer cookies and, I'm telling you, these are ADDICTING!
Anya loved decorating the gingerbread boy and girl with chocolate chips and I think she did a great job! She gave some of them 3 eyes so that they could see better and the gingerbread girl with all the chips on her dress Anya made for her best friend, Alexis. I love my little sous chef!
Hope everyone is able to take some time today to relax and enjoy time with family and friends. Lots of love and well wishes being sent your way for a very merry holiday season!
 This little girl LOVES baking! (Or is it eating? HEE HEE!)
 Eric wants to make sure you can see him, too!
 Gingerbread Boy and Girl
 Anya's beautiful creations!
Gingerbread Dough for Houses or Cookies
1 cup butter
1 cup sugar
1 cup molasses
4 and 1/2 cups flour, plus more for rolling
1 teaspoon baking soda
1 teaspoon salt
1 teaspoon cinnamon
1 teaspoon ginger
In a medium saucepan, melt butter over meidum heat. Stir in sugar and molasses over low heat, stirring until dissolved. Remove from heat.
Monday, December 22, 2008
TWD: No pudding... Rewind instead!
This week's recipe was Real Butterscotch Pudding. At the beginning of the month I had already decided not to make it. I don't drink and really didn't feel like going out and buying scotch. Then I read on the TWD questions thread that you could omit the scotch from the recipe. I considered it and was going to go ahead and make the pudding, but a few hours later I decided not to. My to do list is ridiculous right now (I'm currently in the process of making croissants so they are ready when Nathan comes home!) and I am not really in the mood for pudding. So... I will be sitting this week out. :(
But... I do at least have a TWD recipe for you! I have had this sitting in my draft folder for over a month now and I am so happy that I have a chance to post it! I had leftover homemade dulce de leche and needed to use it. I remembered seeing the recipe for Snickery Squares in the book and it sounded delicious!
Guess what??? It WAS! Well, I mean, of course it was. It is Dorie and this woman just doesn't seem to have many misses! A yummy shortbread crust, dulce de leche, peanuts, and chocolate make up this delicious dessert. I really enjoyed it!
Snickery Squares was chosen by Erin of Dinner & Dessert back in March and the recipe can be found at her blog. The pudding recipe for this week was chosen by Donna of Spatulas, Corkscrews, and Suitcases. Check out her blog for the recipe and don't forget to check out the blogroll to see all the pudding!!!
Sunday, December 21, 2008
Cucumber Sandwiches
Is it really Christmas week already??? This month has just flown by, although you won't be hearing any complaints from me! Nathan starts his journey home tomorrow (it takes usually around 4 days). Between Christmas and Nathan, this is going to be one amazing week!!! :)
This is one of my favorite appetizers ever! They are so cute and delicious! You could also just make it one big sandwich and have it for lunch. YUM! Cucumber Sandwiches
8 oz cream cheese
1/2 cup mayonnaise
1 (.7 oz) package Italian salad dressing mix
2 medium cucumbers, sliced
Pinch of dill weed
Bread (French, Rye, Whole Wheat - anything you want!)
In a medium bowl mix together cream cheese, mayonnaise, and Italian dressing mix. Refrigerate for at least 6 hours; preferably overnight.
Spread cream cheese blend onto slices of bread. Top with a cucumber slice and sprinkle with dill.
The cream cheese mixture will keep for up to a week in the refrigerator.
Tuscan Chicken Pasta
What do we all really need during this time of year? Okay, well there are lots of things, I'm sure, but when it comes to dinner, I need something quick AND delicious. This meal is both of those things, and pretty healthy, too! It may just help to balance out all the wonderful holiday treats!!! :)

Tuscan Chicken Pasta
2 oz penne
2 chicken breasts
Salt and pepper
1 tsp olive oil
1 clove garlic, crushed
1/2 tsp dried rosemary
1 cup cannellini beans, rinsed
2 TBSP roasted red pepper, diced
4 cups baby spinach
2 TBSP grated parmesan
Cook the pasta according to package directions. While pasta is boiling, season the chicken with salt and pepper. Cook chicken in skillet; set aside. Add oil, garlic, rosemary, beans, red pepper, and spinach to skillet. Cook, turning frequently, until spinach wilts.
Slice the chicken and drain pasta. Toss with bean/spinach mixture. Top with parmesan.
Saturday, December 20, 2008
Award and Cookbook Collection

This is my cookbook collection. I don't have a lot of extra room in the kitchen, so they stay on these shelves in my laundry room. I love going in there and picking up one and reading it. Not just looking through it, but actually reading it like a novel. Am I weird? I'm hoping there are others out there like me! Oh, and don't fret that Baking: From My Home to Yours isn't on the shelf. It stays on my cookbook holder next to the stove!

In addition to my cookbooks, I have this magazine holder that holds folders and my binder. The folders are divided into categories (main dish, side dish, desserts, etc) and this is where I keep recipes that I pull out of magazines.

The binder holds all the recipes that I have made that are "keepers". I put together a family cookbook a few years back for Christmas and included all of my keepers up to that point and these are recipes that have been keepers since then.

I unfortunately can't show you the last place that I keep recipes... my favorites folder! Thanks to all the wonderful food bloggers, I have an ever growing folder online! So many delicious recipes that are calling my name that I am eager to try!
Is anyone else bummed that there will never be enough time to make all the recipes that are out there??? I may not be able to make them all, but I sure will try!
Now... what's on your shelf?
Friday, December 19, 2008
Cheese of the Month - Havarti
 It's cheese time again and this month the selection was Havarti. Havarti is a semi-soft Danish cow's milk cheese (thanks, Wikipedia!). Originally I thought that I had never had Havarti before. But, once I purchased it and tasted it, I realized that I have. Here in Germany we have amazing bazaars that are held throughout the many military installations. Vendors come from all over Europe and the shopping is wonderful! There is always a cheese guy with tons of different cheeses. I like tasting all the cheeses, but apparantly I never paid much attention to the names. So, long story short- I've had Havarti before and I really like it! :)
I decided to make spaetzle (German egg noodles/dumplings) with the havarti. I found a wonderful recipe on Recipezaar. It called for bacon and cheese to be baked with the spaetzle. Let me tell you... it was DELICIOUS! Although, can you really ever go wrong with bacon and cheese?
I served it with pork medallions and a salad and it was a yummy dinner! I hope you'll give it a try!
As always, thanks to Britteny of Adventures in Gluttony for starting this group and hosting the monthly challenges. If you would like to join along with the fun, check out her blog! Also, you have until the end of the month to use Havarti, so you still have time to join in the fun for this month!
Baked Spaetzle Casserole
Recipe from Recipezaar
Spatzle:
5 eggs
2 1/2 cups flour
1/4 cup water
1 teaspoon salt
1 dash nutmeg
2 tablespoons butter
Casserole Ingredients:
1 lb bacon
1 medium onion, chopped
3 garlic cloves, crushed
8 ounces havarti cheese, shredded
salt and pepper
For the spatzle, mix eggs, water, salt and nutmeg well. While mixing slowly add flour until it is mixed and smooth.
Using a spatzle press or colander press small batches of dough into boiling water when it floats to top mix it once and continue to boil about 5 minutes (or once it floats,keep in very hot but not simmering water in separate pot, while cooking the rest). Remove it from water with long tongs and put it in casserole. Cook the rest of the dough adding to the casserole or hot water. Use butter to keep them from sticking together.
Preheat oven to 350°F.
Cut bacon into small strips and saute with onion, add garlic for the last few minutes. Drain off fat.
In big mixing bowl add cooled spatzle, bacon mixture, shredded Havarti add salt and pepper to your taste. Spray 9x13 casserole with cooking spray and pour spatzle mixture in it.
Cook about 30 minutes; just until it begins to brown.
Thursday, December 18, 2008
Happy Birthday, Nathan & Butterscotch Blondies
I wanted to wish my wonderful husband a happy birthday! Today is his 29th birthday and I know he is a little bummed that he wasn't able to make it home in time. But, I promise we'll have a big birthday celebration when you get home, sweetie! Every year Nathan asks for a German Chocolate Cake but I found a new cake recipe I wanted to try and he is graciously letting me change tradition! Keep an eye out for that at the end of the month! :)
Now, since it is Nathan's birthday, I thought I would post one of Nathan's favorites. He LOVES, LOVES, LOVES butterscotch blondies. I made these a few weeks ago and surprised him with them and a birthday package. He didn't think I was sending anything to Iraq since we had decided to wait to celebrate until he got home. But, I couldn't not send him anything. So, off went a package with a present and some goodies!
I love you, Nathan, and hope your birthday is as wonderful as it can be in Iraq! See you so soon!!!
Butterscotch Blondies
2 1/2 cups flour
1 tsp baking powder
1/2 tsp salt
1 cup butter
1 3/4 cups packed brown sugar
1 TBSP vanilla
2 eggs
11 oz butterscotch morsels
Preheat oven to 350.
Combine flour, baking powder, and salt. Beat butter, sugar, and vanilla until creamy. Add eggs. Gradually add dry ingredients. Mix in 1 cup of morsels.
Spread into 9x13 pan and sprinkle with remaining morsels. Bake 30-40 minutes or until toothpick inserted in center comes out clean.
Wednesday, December 17, 2008
Chocolate Dipped Orange Butter Cookies
The day has come... this is my last cookie recipe. Well, the last one that has been made so far! I am seeing SO many delicious cookies and treats around the food blogosphere and have added many to my list. But, for now, this is the last one! :)
These were really good, especially dipped in chocolate! I added orange zest to the dough to up the orange flavor. I loved these cookies and they didn't last long. I'll be honest... these ones didn't even make it to the freezer. But, in my defense, I only made a half batch, so I had 8 cookies and 4 I gave away. So really, I only ate 4. And, I swear, it wasn't all in one day!
And on a completely seperate note.... has anyone noticed that my countdown is now in single digits????? Nathan is coming home so soon!!! WOO HOO!!!!! Chocolate Dipped Orange Butter Cookies
Original recipe from Smells Like Home
1 cup butter
1/2 cup sugar
1 egg
1 tsp pure vanilla extract
1/2 tsp pure orange extract
1 tsp orange zest
2 1/3 cups flour
Chocolate, for dipping
Cream butter. Gradually add sugar and beat until light and fluffy. Beat in eggs and extracts. Gradually blend in flour.
Flatten dough into discs and wrap in plastic wrap or shape into logs and wrap. Refrigerate for 4 hours.
Cut shapes or slice the logs. Place cookies on ungreased baking sheet.
Bake in 350 degree oven for 8-10 minutes. Remove immediately to wire rack to cool.
While cookies cool, melt chocolate. After cooling, dip the orange cookies in the melted chocolate and place on parchment paper to cool.
Tuesday, December 16, 2008
Festive Shortbread Bites and a Snowball Variation
I'll admit it... I'm slightly obsessed when it comes to baking. Especially around the holidays. If I see an interesting recipe, I have to try it. It doesn't matter if I have already made 17 different kinds of goodies. I have no self control. Well, at least not with the baking aspect. I don't eat all of it, but I do try every one!
My friend Monica made me realize recently that I enjoy the baking/creating aspect more than the eating. And, you know what, Monica was totally right! Don't get me wrong, I LOVE eating. But, I enjoy the process of making the food more. As soon as I am done with one recipe, I want to start another. Hmmm... I think I see a membership to Baker's Anonymous coming soon!!! :)
Two cookies for you today. One is a super cute shortbread. I love the flecks of red and green throughout. And I can totally see this recipe being used for any holiday. Just mix up the colors and you've got yourself a festive treat! The other is a variation on the Snowballs I posted earlier in the month. Now, while I LOVE nuts in these, I realize that there are people who don't like nuts or can't have nuts. I think these cookies are way to good to pass up, so if you don't like/can't have nuts, try adding mini chocolate chips! SO GOOD! (I did half of the batch with leftover holiday swirl morsels, too!) You can find the recipe for the snowballs here.

Shortbread Bites
1 1/4 cups all-purpose flour
3 tablespoons sugar
1/2 cup (1 stick) butter, cold, cut into pieces
1 tablespoon red and green nonpareils or sprinkles or 1/2 cup mini baking bits
Preheat oven to 325 degrees F.
In food processor with knife blade attached, pulse flour and sugar until combined. Add butter and pulse until dough begins to come together. Place dough in medium bowl. With hand, gently knead in nonpareils or baking bits until evenly blended and dough forms a ball.
On lightly floured waxed paper, pat dough into 8" by 5" rectangle; freeze 15 minutes. Cut dough into 1/2-inch squares. Place squares, 1/2 inch apart, on ungreased large cookie sheet.
Bake cookies 18 to 20 minutes or until lightly browned on bottom. Transfer cookies to wire rack to cool. Repeat with remaining dough.
Store cookies in tightly covered container at room temperature up to 1 week, or in freezer up to 3 months.
Monday, December 15, 2008
TWD: Buttery Jam Cookies
 Today I eat my words. Remember how I said that I must not be a jam with my cookie kind of gal? Well... not only did I end up falling in love with the Sables, but these cookies were AWESOME!
I loved the bits of apricot jam throughout the cookie. These were easy peasy to make and so delicious to eat!
Thanks to Heather of Randomosity and the Girl for choosing this weeks recipe. Head over to her blog for the recipe and check out the blogroll to see what wonderful variations were created!
Sunday, December 14, 2008
Broccoli Cheddar Soup
Just in case you thought that I have only been eating sweets lately, here is proof that I actually do eat real food! This soup was fantastic! I've had it twice in the last week and I love it! It is a perfect dinner for these cold winter nights! Enjoy!
Broccoli Cheddar Soup
Recipe from Key Ingredient
3 tbsp butter
1 large Jalapeno, finely chopped
1 small onion, finely chopped
2 cloves garlic, finely chopped
1 tbsp chives, finely chopped
1 tsp salt
½ tsp pepper
1 cup vegetarian broth
1 cup heavy cream
3 cups broccoli (thawed to room temperature, if you are using frozen broccoli )
2 cups sharp cheddar cheese
In a medium pot, melt the butter over medium-high heat. Add the jalapeno, onions, salt, pepper and garlic and stir until soft, for about 3 minutes. Add the vegetarian stock and bring to a boil.
Saturday, December 13, 2008
Italian Sprinkle Cookies
I found this recipe at The Life and Loves of Grumpy's Honeybunch. Shelby has such an awesome blog and as soon as I saw these cookies I knew I had to give them a go. Mine are nowhere near as pretty as Shelby's, but man were they delicious!!! Plus, Anya loved helping with the sprinkles! I think it is a requirement that 3 year olds be obsessed with sprinkles!
Italian Sprinkle Cookies
Recipe from The Life and Loves of Grumpy's Honeybunch
6 eggs
Glaze:
3-3/4 cups confectioner's sugar
Using a heavy-duty mixer, beat eggs on high speed until light and foamy, about 5 minutes; set aside in a large mixing bowl, combine the flour, confectioners' sugar and baking powder; on low speed, gradually beat in shortening and extracts until mixture resembles fine crumbs. Gradually add beaten eggs (dough will be stiff).
Roll dough into 1-inch balls. Place 2 inches apart on ungreased baking sheets. Bake at 350 for 12-14 minutes (tops of the cookies will not brown, but bottoms should brown slightly).
Meanwhile, in a small bowl, combine the confectioner's sugar, milk and extracts until smooth. As soon as cookies are removed from the oven, quickly dip two or three at a time into glaze. Remove with a slotted spoon or tongs. Place on wire racks to drain. Immediately top with sprinkles.
Let dry for 24 hours before storing in airtight containers.
Yield: About 7 dozen.
Peppermint Stick Shortbread
I've been out of the house all day, but I wanted to get this posted. I took Anya to go see Madagascar 2 and she loved it! And there was the added bonus that Eric slept on my lap through the whole movie! Awesome!!! We had a great day, but now that the kids are sleeping, I'm off to bed, too!
These cookies are so good! Very pepperminty and delicious! If you aren't done with your holiday baking, these would be a great addition to your list! Peppermint Stick Shortbread
Recipe can be found at LunaCafe
Friday, December 12, 2008
December Cookie Carnival
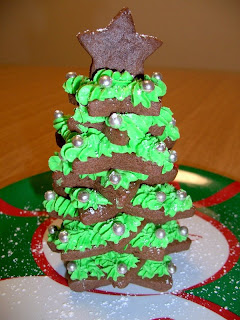 Who's up for a carnival? Anya and I were and we had a blast with this month's selection. Kate of The Clean Plate Club gave us two recipes this month, a vanilla and a chocolate cut out cookie. I decided to go for the chocolate cookie for two reasons. One, we just did a basic sugar cookie with TWD and two, well, everything is better with chocolate!
These cookies were fantastic! They were almost like a brownie cookie. They held their shape really well and didn't fall apart, but they had a brownie taste. SO GOOD! Then you go and add some yummy buttercream on top and you have yourself a delicious holiday treat!
I decided to use my star cookie cutters and make a little Christmas tree. I think it turned out cute and it was a fun little project. I dusted the tree with a little powdered sugar for a "snow" effect. Anya decided to just use sprinkles on hers, but she had so much fun decorating the cookies.
Enough writing... you know you want to see some pictures of Anya decorating these cookies!

 Anya REALLY loves those sprinkles!
 That is one happy girl!
1/4 cup unsweetened cocoa powder
1/2 teaspoon baking powder
1/2 teaspoon salt
1/4 teaspoon baking soda
1/2 teaspoon ground cinnamon (optional)
3 ounces bittersweet chocolate, chopped
1 cup (2 sticks) butter, room temperature
1 1/3 cups sugar
1 large egg
1/2 teaspoon vanilla extract
Sprinkles or other sugar decorations (optional)
Royal Icing (optional)
Position rack in center of oven; preheat to 350°F. Line 2 baking sheets with parchment paper.
Use an offset spatula to peel away the excess dough and transfer the cookies to parchment-lined baking sheets, spacing 1 inch apart. Gather scraps, roll out dough, and cut more cookies, repeating until all dough is used. If not icing cookies, decorate with sprinkles or other sugar toppings, if desired.
Bake 1 sheet at a time until cookies are firm on top and slightly darker around edges, about 9 minutes for smaller cookies and up to 12 minutes for larger cookies. Line baking sheets with fresh parchment as needed. Cool completely on rack.
Thursday, December 11, 2008
Martha Washington Candy
I can't focus lately. All my thoughts seem to be about how I haven't seen Nathan in 8 1/2 months and how he will be here, right in front of me, in about 2 weeks. I am so excited and the butterflies have already set up camp in my belly. I am in a sort of limbo right now. He is so close to coming home, but not quite close enough for me to start preparing everything for his arrival. So, what am I doing??? Taking up residence in the kitchen!
Oh, and just a little disclaimer. Since I am so out of it, my posts may be a little loopy. Not much I can do about that! :) Hopefully you can bear with me!
One of my greatest memories of the holidays growing up has to be my mom making candy. Every holiday season, no matter how busy she was, she would get in the kitchen and make yummy candy. She makes the BEST butter crunch, which I really need to try my hand at. She showed me how to do it a few years back, but I have misplaced the recipe.
In addition to her butter crunch, she would make Martha Washington's. My favorite are the ones with coconut; they remind me of little Mounds candy bars. So delicious! You could add just about anything you want in these. Thanks for a yummy recipe, Mom!
Yuletide Layer Bars
Yummy, easy, festive! What more could you ask for? Yuletide Layer Bars
1/2 cup (1 stick) butter or margarine
1 1/2 cups graham cracker crumbs
1 1/2 cups flaked coconut
1 cup chopped nuts
1 can (14 oz.) sweetened condensed milk
1 cup (6 oz.) Nestle Swirled Holiday Morsels
3/4 cup semisweet chocolate chips
Melt butter in 13 x 9-inch baking pan in oven; remove from oven. Sprinkle graham cracker crumbs over butter. Stir well; press onto bottom of pan. Sprinkle with coconut and nuts. Pour sweetened condensed milk evenly over top. Sprinkle swirled and semi-sweet morsels over milk.
Bake for 25 to 30 minutes or until light golden brown. Cool completely in pan on wire rack.
Wednesday, December 10, 2008
Peppermint Bark
It's been a few days since I have told you about myself, so here is another little tidbit. :)
I am incredibly shy in person. To be honest, if any of you met me in real life, you probably wouldn't talk to me. Not because I'm not nice, but because I wouldn't talk! I get so nervous around people and, unless I know you, I sit there and get very anxious about what to say. Most times I think I come off as a snob because I don't talk, but really it is just because of my nerves. But, once I get to know you, there is no shutting me up! :)
Now, speaking of not shutting me up... I CAN'T stop talking about this peppermint bark. It is out of this world fantastic!!! The recipe comes courtesy of Leslie from The Hungry Housewife and it is DANGEROUS! Make sure you hide it or give some of it away or else you will eat it all! It is yummy, yummy, yummy! What are you waiting for??? Go make it!!!
Monday, December 8, 2008
TWD: Grandma's All Occasion Sugar Cookies
 I feel like I've been a downer lately with TWD. I haven't been over the moon excited about some of the recent recipes. They have just been okay for me. Nothing that has stood out to be amazing.
This week is no different. I love sugar cookies, but I have a favorite recipe that I use and I guess I just don't like change. Don't get me wrong... these cookies were good! They just weren't my favorite.
I kept the dough plain because I wanted to experience the basic recipe. I sprinkled them with cinnamon and sugar and they reminded me of snickerdoodles.
Thanks to Ulrike of Kuchenlatein for choosing this recipe. Head over to her blog for the recipe and don't forget to check out the blogroll. I'm sure there are AMAZING sugar cookies out there today. :)
Sunday, December 7, 2008
Egg Nog Bread (or muffins!)
I think I made my love for egg nog clear with the egg nog cookies, but just in case you were wondering if I actually love it, here is another wonderful recipe! I usually make this into a loaf, but was in the mood for minis! So, here are my egg nog mini muffins! They are moist and delicious and full of yummy egg nog flavor!
Oh, and I'll soon be trying my hand at homemade egg nog! I'll let you know how it turns out! Egg Nog Bread
2 eggs, beaten
1 1/2 cups egg nog
2 tsp rum extract
1 cup sugar
1 tsp vanilla extract
1/2 cup butter, softened
2 cups flour
2 tsp baking powder
1/2 tsp salt
1/4 tsp nutmeg
Preheat oven to 350. Grease bottom of loaf pan.
Cream butter and sugar. Add eggs, egg nog, rum extract, and vanilla. Sift together dry ingredients; add to wet and stir just until moistened.
Pour into prepared pan. Bake about 50 minutes or until toothpick insterted in center comes out clean.
Dust with powdered sugar, if desired.
Daring Bakers Past Challenge: Biscotti
Here is another wonderful treat to add to your Christmas trays! This was the second Daring Baker challenge back in December 2006. The recipe comes from Dorie Greenspan's Baking: From My Home To Yours.
I added dried cherries to the biscotti and it was wonderful! I would've loved to have dipped them in white chocolate, too, but they were being sent to Iraq and while it's winter here, I really question whether Iraq has any season other than HOT!
Sorry this post is so short... I am feeling a little unmotivated and I have to get dinner started. Is it bedtime yet??? :)

Chocolate Biscotti
Dorie Greenspan
2 cups all-purpose flour
½ cup unsweetened cocoa powder
2 tablespoons instant espresso powder
¾ teaspoon baking soda
½ teaspoon baking powder
1 teaspoon salt
¾ stick (6 tablespoons) unsalted butter, at room temperature
1 cup sugar
2 large eggs, lightly beaten
1 teaspoon pure vanilla extract
1 cup chopped almonds, blanched or unblanched
4 ounces bittersweet chocolate, coarsely chopped, or ¾ cup store-bought mini chocolate chips
Sugar, for dusting
Center a rack in the oven and preheat the oven to 350 degrees F. Line a baking sheet with parchment or a silicone mat.
Sift together the flour, cocoa, espresso powder, baking soda, baking powder and salt.
Working with a stand mixer, preferably fitted with a paddle attachment, or with a hand mixer in a large bowl, beat the butter and sugar together on medium speed until pale, about 2 minutes; the mixture may be crumbly. Scrape down the sides of the bowl, add the eggs and vanilla and beat for another 2 minutes; don’t worry if the mixture looks curdled. Reduce the mixer speed to low and mix in the dry ingredients in 3 additions, mixing only until a dough forms. Scrape down the sides of the bowl. Mix in the chopped nuts and chocolate, then turn the dough out onto a work surface and knead in any dry ingredients that might have escaped mixing.
Divide the dough in half. Working with one half at a time, roll the dough into 12-inch-long logs. Flatten both logs with the palm of your hand, so that they are ½ to 1 inch high, about 2 inches across and sort of rectangular, then carefully lift the logs onto the baking sheet. Sprinkle each log with a little sugar.
Bake the logs for about 25 minutes, or until they are just slightly firm. The logs will spread and crack - and that’s just fine. Remove the baking sheet from the oven, put it on a cooling rack and cool the logs for about 20 minutes. (Leave the oven on.)
Working with one log at a time, using a long serrated knife, cut each log into slices between ½ and ¾ inch thick. Stand the slices up on the baking sheet - you’ll have an army of biscotti - and baking the cookies again, this time for just 10 minutes.
Transfer the biscotti to a rack to cool.

Saturday, December 6, 2008
And the award goes to....
Priscilla of Priscilla's Baking Adventures has spoiled me with another award! Priscilla is so awesome and if you haven't checked out her blog then you need to get over there! She is a 17 (as of a few days ago!) year old girl and the recipes she posts are amazing. She is one of my blog heroes!
I still need to pass along the awards given to me 2 weeks ago, so today I will be giving away all 3 blog awards! I love all of these blogs! They are all an inspiration to me and I enjoy checking in on them to see what they are cookin'!

The Uber Amazing Blog award goes to:
Shelby of The Life and Loves of Grumpy's Honeybunch
Betty of Eat My Cupcake
 The Butterfly Award goes to:
Pamela of Cookies with Boys
Megan of My Baking Adventures
The Your Blog is Fabulous award goes to:
Leslie of The Hungry Housewife
Michelle of Flourchild
You all rock!!!! :)


.jpg)


